|
Free-Conversant Support / User's Manual - 2 |
| Home | About Conversant | Free Sites | Hosting | Support | XML-RPC |
|
Support Home Documentation Search Support Site Discussion Group Ask a Question Recent Topics Message Calendar Membership Logon Join Now! Subscribe via Email Unsubscribe via Email |
Using the calendar
- 1. Navigation
- 2. Filtering
- 3. Default View
- 4. User Preferences
- 5. Viewing An Event
- 6. Creating An Event
- 7. Editing An Event
1. Navigation
Navigating in the calendar allows you to display the periods and the events you want.
There are three calendar views:
- Month View
- Week View
- Day View
... and two event views:
- Event Viewer
- Event Editor
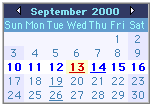
 You may navigate between the calendar views by using the navigation calendar (shown below), the links in the Filters box (shown on the right), and the links in the calendars header (the wedge icons). The links in the Filters box and the navigation calendar are context sensitives, so they'll act differently depending on the view currently displayed.

For example if you're looking at a week which is three months in the future, (in week view), clicking on the "Month" link of the Filters box will display the month view of the month that contains the week you were looking at (read it again, it will make sense ;-).
Another example: if you're in week view, clicking on a day in the navigation calendar will display a 7-days view starting with this day (it looks like the week view but starts with the day you chose, instead of starting on the first day of the week). However, if you're in day view, clicking on a day in the navigation calendar will display that day in day view.
Note that from any view, clicking on the "Day" link in the Filters box will bring you the current day in day view.
Finally, in any view, clicking on an event name will open a new (smaller) window to display the full information from this event (your browser must support and enable Javascript for this to work). Also, if you're a Contributor or an Editor, you'll see a pen icon in the events you may edit. Clicking on this pen will open a new smaller window too (if it's not already open) and bring you in the event editor (we'll see it in details later).
2. Filtering
Any event may have none, one or several categories attached to it. A category is a kind of flag used to identify an event, to hilight it, or just to add more informations. These categories are split in several category groups and are fully manageable by the site's Admins (put differently, the number and content of these category groups may vary from calendar to calendar).
The category groups in default calendars are "Priority" (that contains items like "Highest", "High", etc) and "Type" (that contains items like "Anniversary", "Appointment", etc).
Categories may be displayed in any view, as icons or as colored background, and you can choose to filter the displayed events on their categories.
Each category group defined in a calendar will appear in the filters box (as shown above). You filter the views by selecting one or several categories in the list box(es) of the filters box, and by clicking on Set View. This works in any view (Month, Week, or Day).
Once you've set a filtered view (for example to display only events whose Priority is "Highest"), you may change the view (Month, Week, Day) and navigate in the time as you want, your filters will remain active.
3. Default View
When you request the root level of the calendar (in our demo calendar site: <http://www.free-conversant.com/calendarDemo/calendar>), the view you get by default is defined by the Admin. If you're at least a member (and if you're logged in), you can set your own default view.
For example you might want to see all the events in the current week, or all the events whose priority is High or Higher in the current month, etc.
To set your default view, set your current view as you want your default. That is display the Month view if you want to see the whole month, and so on. Also set the filters as you want them and don't forget to click on "Set View" (see Filtering).
When this is done, click on the button labelled Default View. The page will reload and you'll see a confirmation at the bottom of the Filters box.
4. User Preferences
In addition to the default view, there are several preferences that you can set. Click on the User's Options link at the bottom of the Filters box. You'll get the Options page. Here's what it contains:
Personal Info
This link points to the page where you can change your email address, your password, and a few other infos (you may be prompted for your username and password, to access that page).
Localization
At the moment, only dates and time formats can be localized. The Localizations popup menu may contain several different localization sets. These sets are manageable by the site's Admin, so the number of choices in there depends on him. This calendar has two sets: "US English" and "Francais".
Localization sets determine:
- month names translation
- day names translation
- short dates format
- long dates format
- first day of week
Confused? Just compare these two screenshots. They show the same week in English and in French.


Reload Calendar Pages
From there you choose if the main Calendar window will reload when you submit changes in the Event Editor (creating or editing events).
Working Hours
This section lets you define the range of hours that will be displayed in your day views. If an event occurs at a time outside of your selected range, you'll see it in Month and Week views, but not in Day view.
Default View
This section describes your current default view, but you cannot change it from there. To change it, see Default View.
When you're done setting your preferences, click on Save Changes.
If you want to revert your preferences to their default values, click on Restore Defaults.
5. Viewing an Event
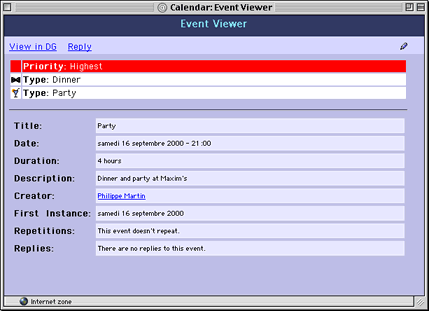
Clicking on an event name in any view (Month, Week or Day) opens a new window (if it hasn't been already opened) to display the Event Viewer.

The Event Viewer shows you all the informations about the selected event (Note that this screenshot and the next ones have been taken with the French localization set).
Everything there should be obvious. But note that you can see the event in the Discussion Group by clicking on the "View in DG" link, and you can reply to this event by clicking on "Reply". Also, if your membership level allows you to edit this event, you'll see the pen icon, and clicking on it will take you to the Event Editor dialog (see Editing an Event).
6. Creating An Event
This section concerns you only if your membership access level is Contributor or higher (as seen earlier, Members can be made Contributors without knowing it specifically, so to make it simple, lets just say that you're a contributor if you can see "Add" links in calendar views).
To create a new event, click on the "Add" link of the day when you want the event to start (this is not an obligation, you can click on any Add link and change the date in the Event Editor).
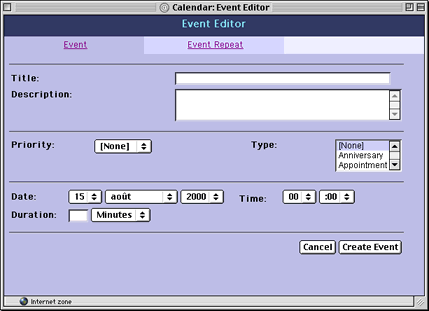
A new window will open, displaying the Event Editor dialog (this feature requires that your browser supports and enables Javascript). Note that this window may be smaller than your main window, and that it doesn't have scrollbars. But you can still resize it, in case your font settings would prevent the whole content to be displayed without scrolling.
This window is composed of two panels: "Event" and "Event Repeat". Click on these links, at the top of the window, to switch the view between these two panels. Here's what the panels contain:
Event

Title
This is the name or the title of the event. That's what will be displayed in Month, and Week views (and also in Day view, but there's more, in there). This will also be the subject of the email if/when the event will be sent by email.
Description
This text box lets you enter a longer description for the event. It will be displayed in Day views and in the Event Viewer. This will also be the body of the email if/when the event will be sent by email
Priority and Type
These are the category groups in this calendar. Depending on the Admin, the number, the name and the content of the category groups displayed may change. The Admin also decides if you can select only one category in a group (then it is a popup menu like "Priority"), or if you can select several categories at once (then, that's a list box like "Type").
Date and Time
Enter here the date and time when you want the event to start. The values will have been automatically set depending on the "Add" link on which you clicked, but feel free to change them to whatever you want.
Duration
Enter here the duration of the event, and use the popup menu to specify Minutes, hours, etc. Don't mix up the "event duration" with the "repetitions duration", as described in this section.
Submission
If your event doesn't have any repetitions, you're done. Click on Create Event to save your changes. The window will reload, and you'll see at the bottom of the screen a confirmation that your event has been created.
If you don't want to create the event, click on Cancel. The window will be closed and your changes will be lost.
Note that you may click on the "Create Event" or "Cancel" button in each panel with the same exact result.
Event Repeat

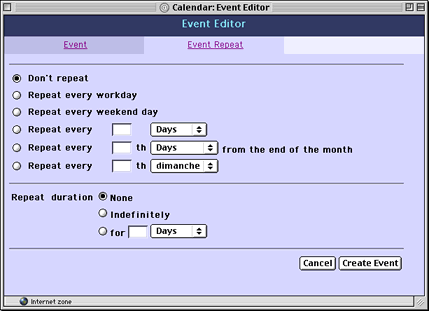
The first section of this panel allows you to define the repetitions of this event (for example, you may want a birthday event to repeat every year).
Don't repeat
This is the default value.
Repeat every workday
Select this if you want the event to repeat every work day (that excludes weekends, even if some boss force their pooor employees to work during the weekend too ;-). So an event that repeats every weekday for two weeks would have 10 actual instances.
It is an error to try to create an Every Workday event that starts on a weekend day.
Repeat every weekend day
Similar to Every Weekday, above, but applies instead to events which happen on Saturday and Sunday only. So an event that repeats every weekend day for two weeks would have 4 actual instances.
It is an error to try to create an Every Weekend Day event that starts on a regular weekday.
Repeat every ____ [Days]
This is a "periodic event". Periodic events are quite simple. They allow you to set an event to repeat every 10 days, for example, or every 17 weeks, every 4 months, etc.
Enter a number in the text box, and select a period in the popup menu (Days, Weeks, etc).
Repeat every ____ th [Days] from the end of the month
This is an "offset event". Offset events are events which are offset from the beginning or end of every month (for the event's repetition duration). This choice allows you to define an event that repeats every last day of the month, for example (every 0 day from the end of the month), or every last Monday (every 1 Monday from the end of the month), etc.
Enter a number in the text box and select a period in the popup menu (Days, Sunday, Monday, etc).
Repeat every ____ th [Sunday]
This is an offset event too (see the explanations above). From there, you can set an event to repeat every second Tuesday of the month, for example, or every first Sunday, and so on.
Enter a number in the text box and select a day in the popup menu (Sunday, Monday, etc).
Duration
This section allows you to define how long the repetitions will last. For example, if you've set the event to repeat every last Sunday in the repeat section, you'll use the duration to determine how many times the event will repeat (you could set it to three months, ten years, or whatever). Don't mix up the "repetitions duration" with the "event duration" as described in this section.
None
This is the default duration when you create a new event. As soon as you'll change the repetitions setting (which defaults to "Don't Repeat"), you'll have to change the duration too.
Indefinitely
Select this if you want the event to repeat forever.
For ____ [Days]
Use this to set a finite duration (like 3 months or 10 years.)
Enter a number in the text box, and select a period in the popup menu (Days, Weeks, etc).
Submission
When you're done, click on Create Event to save your changes. The window will reload, and you'll see at the bottom of the screen a confirmation that your event has been created.
If you don't want to create the event, click on Cancel. The window will be closed and your changes will be lost.
Note that you may click on the "Create Event" or "Cancel" button in each panel with the same exact result.
7. Editing An Event
Each time your membership level allows you to edit an event, you'll see a pen icon (in any view, Month, Week, Day, or Event). Clicking on the pen will open a new window (if it hasn't been already opened) and will take you to the Event Editor.
The only difference in the Event Editor when editing an existing event and when creating a new event, is the content of the submission row: Instead of the "Cancel" and "Create Event" buttons you see when creating a new event, when editing an event you'll see "Delete Event", "Cancel", and "Update Event". Here too, clicking a button in a panel or in the other doesn't make any difference.
The rest of the dialog is and behaves exactly like when creating an event, so please see Creating an Event for more information.